Welcome to our Help Center.


Our Help Center is designed to give you a place to get the information you need to be effective at using our site.

You can find information by browsing the sections and categories on the left hand dropdown menu (top if you have a very small screen)

We appreciate any feedback regarding the design of the help center, or new bits of information to add, including tutorials; You can open a ticket with us at any time.


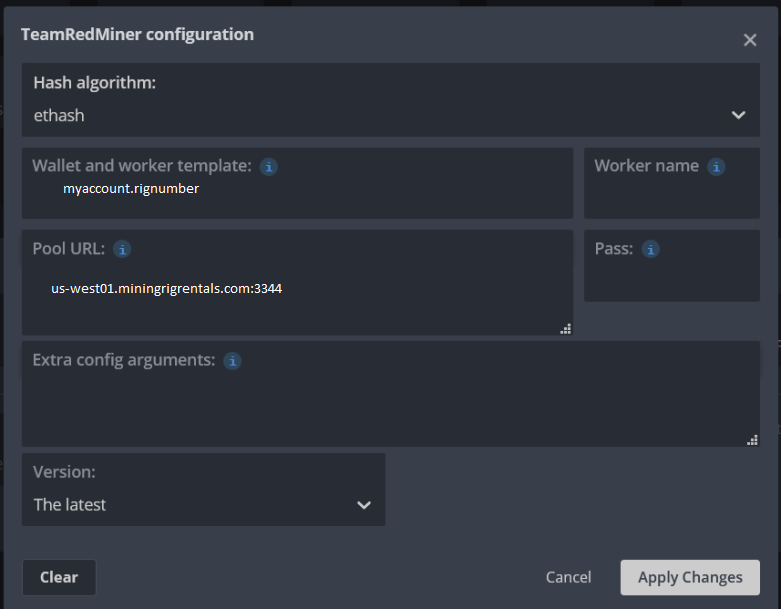
Short Tutorial for HiveOS

HiveOS is a "Mining OS" that aims to provide the user with a one stop solution for mining. We at MRR make it simple to mine. There are only two pieces of information you need to be able to setup a miner, the pool url and your worker login.
Below is an example of what to enter for HiveOS configuration page, note that the information you input is obtained on your rig's Connection Information tab. 
 

Learn how to rent your first rig by watching this user submitted tutorial video


Learn how to rent your first rig by watching this user submitted tutorial video


Pool Management for Rentals

Introduction

Pool Configurations

Saved Pool Requirements

Create a Saved Pool Configuration

Failover Pools

Profile Configs

Create a Profile Configuration

Supported Hashing Algorithms


Introduction

Pool Management consists of two parts at MiningRigRentals: Favorite Pools and Pool Profiles.

  • Favorite Pool - An individual record of a mining pool credentials.

    • Favorite Pools are REQUIRED

  • Pool Profiles - A set of Favorite Pools that share the same algorithm type.

    • Pool Profile are not required BUT will likely make your mining experience much easier.


Pool Configurations

Saved Pool Requirements

Before you create a Favorite Pool, you must gather the following information from the pool provider:

  1. Hashing Algorithm - Click HERE to view currently supported Hashing Algorithms.

  2. Host - Server endpoint supplied by your pool provider.

    • Pool Hosts are typically supplied using the following format:
      stratum+tcp://pool.server:PORT

    • Currently, MiningRigRentals only supports stratum+tcp:// pools.

  3. Pool Username - Depending on the pool, the username may be a Destination Wallet or a Username.

    • Wallet Example:           Ae9TJzgua3xQzRChsaTJAtqJYXGQa2WEYZ.mrr

    • Username Example:        nickganga.mrr

Note: The suffix .mrr is used to identify the worker on the pool. Pool support may vary for this feature. Please check with your pool for compatibility.  

  1. Pool Password - Depending on the pool, this field may or may not be necessary.

    • Some pools allow you to set variables (such as difficulty) via the password field.

    • Check with your pool operator for variable support in the password field.

Create a Saved Pool Configuration

After you have gathered the Pool Information (as described above), it’s time to create the pool record.

  1. After logging into the MiningRigRentals site, access the DROP DOWN menu from your USERNAME in the top right corner and choose Favorite Pools.

  1. From the Saved Pool Configuration window, choose the green Add a Pool button.

  1. Using the information gathered in the previous step (Saved Pool Requirements) complete the Saved Pool Profile.

In this example, I am creating an entry for mining ZCash on Suprnova.

  1. After completing all the required pool fields, choose Save.


  1. You will now see the newly created Pool in the list.


Congratulations, you have just created your first Saved Pool Configuration!

Failover Pools

  • It’s very important to define AT LEAST 2 Pool Endpoints for each pool.

  • Generally, pool operators have multiple Pool Endpoints in multiple geographic regions.

  • Starting from the example from above (Creating a Favorite Pool), repeat the process to create additional Pool Endpoints.


Profile Configs

Create a Profile Configuration

After creating at least 2 Pool Profiles, we can combine two or more Saved Pool Configurations to create a Pool Profile.

  1. Navigate to Profiles:

    1. From the Saved Pool Configuration page, choose the blue Profiles button.

  1. From anywhere else, access the DROP DOWN menu from your USERNAME in the top right corner and choose Pool Profiles.

  1. From the Saved Profile Configuration page, choose the green Create New Profile button.

  2. Provide a name to describe your Saved Profile Configuration, define the hashing algorithm and choose Save.

In this example, I am creating a ZCash Profile for Suprnova.

  1. Now that a new Saved Profile exists, add all appropriate Pool Configurations (created above) to the Saved Profile.

    1. Note: Only Saved Pool Configurations that match the Saved Profile Configurations will appear in this list.

  1. After all profiles have been added, use the UP and DOWN arrows to reorder the pool priority. This profile will failover following the order defined here.

Congratulations, you have just created your first Saved Profile Configuration!

Additional Notes

  • Pool Configurations and Profile Configurations are can be used both my BUYERS and SELLERS.

  • Profile Configurations can contain pool profiles from different pool operators as long as the hashing algorithm is the same.


Supported Hashing Algorithms

  • Blake (2b)

  • Blake256-14-RND

  • Blake256-8-RND

  • Blake2S

  • Cryptonote/Cryptonight

  • Dagger-Hashimoto

  • Equihash

  • Groestl

  • HQM1725

  • LBRY

  • Lyra2RE

  • Lyra2REv2

  • Lyra2z

  • M7M

  • Myraid-Groestl

  • N-Scrypt

  • NeoScrypt

  • Nist5

  • Quark

  • QuBit

  • Scrypt

  • Scrypt-Jane

  • SHA256

  • SHA3-Keccak

  • Skunkhash

  • Timetravel10

  • Whirlpool

  • X11

  • X13

  • X14

  • X15

  • YeScrypt


Connecting your first rig to MiningRigRentals.com in 10 easy steps!


Before getting started you will need the following items:

-Hardware

-Select an algorithm to mine on your hardware

-Mining software for your selected algorithm and hardware

-Select a pool for use when your rig is not rented (Minimum 1 but 2 or more is preferred)

-Connection information for your selected pool(s)


Table of contents

  1. Log in to MRR

  2. Select My rigs

  3. Click Create new Rig

  4. Enter Rig information

  5. Edit the Rig

  6. Enter Pool configuration

  7. Enter Rig Description

  8. Connect Miner

  9. Update pricing

  10. Update Availability


Step 1: Log in to MRR


Step 2: Click ‘My Rigs’ at the top    


Step 3: Click ‘Create New Rig’


Step 4: Enter Rig information

    The following window will appear

  1. You will enter a descriptive name for your mining rig as well as its hashrate.  But be sure to enter the correct measurement units for your rig’s hashrate

b.  Next select the algorithm that your rig will mine on.  Be sure to select the one that is appropriate for your hardware and software combination


c. Next choose the server that is located closest to your physically.


d. After that, select your pricing option.  A value of yes will choose a competitive market value based on other rentals.  No will require you to enter your price manually.  If you are unsure you can leave it on automatic.  Once you are satisfied with all the entries, click ‘Create New Rig’.


Step 5: Edit the Rig

Now you will edit the settings and pool information for your rig.  Click the ‘Edit’   button


Step 6: Enter Pool configuration

  1. At this point you will be adding pool information, so make sure that you have that information ready.  At the top of the screen, click ‘Pool Configuration’

b. Next click ‘Add Pool’ to add your first pool.  Here you will see how to manually add a pool.

c. You will enter the connection information as follows:

Pool Host:  This will be the host:port of the pool you want to mine on when your rig isn’t rented

Workername: is whatever worker name you have configured on your pool.  Sometimes this will be in ‘WALLET_ADDRESS.workername’, other times it will be ‘USERNAME.workername’

Password usually is defaulted to ‘x’ unless you have configured it otherwise

d. When you are done, click save


e. Your pool will now show up on the ‘Pool Configuration’ page:


f. , if you have a backup pool, you can add that as well. If not, proceed to step 7.  Here you will see how to add a pool that has already been saved on mining rig rentals.  Click ‘

g. Then from the window click the ‘Select Existing Pool’ dropdown and choose the pool you wish to use:


h. Once you choose it, the information will automatically populate and then you may click ‘Save’

i. On this screen you will now see however many pools you entered.  You can change the priority using the up and down arrows on the right hand side.  Once you are satisfied you may proceed to step 7.


Step 7: Enter Rig Description

  1. Here you will add a description to your rig.  This will help describe your rig to potential renters.  Use something that will assure your potential renters that your rig is right for them.  From the top navigation bar click rig settings


b. From the menu options on the right half of the Rig Settings screen, click the orange ‘Rig Description’ button


c. Enter your description in the text box and then click the green ‘Update’ button


Step 8: Connect Miner

  1. At this stage you are ready to connect the miner.  At the top left, click the ‘Connection information’ tab.


b. You will be presented with something similar to the following:

c. There are two important pieces of information to locate from the above text.  Number 1:  The server address/port number.  Number 2: The username to connect with.  In the above example the server url/port is:

Us-west01.miningrigrentals.com:3333

And the username is:

rigtutorials101.59599

These two pieces of information will be used to connect the rig to MRR.  Now it is time to locate your miner software mentioned in the prerequisites section.  Once there, you will need to create a *.bat (batch) file in order to start your miner.  This can be done by opening notepad, or any other text editor.  Inside you will enter the commands used to start the mining software and tell it where to connect (MRR).  Most miners use similar syntax such as the following

(EWBF’s ZCash CUDA Miner)

miner --server us-west01.miningrigrentals.com --user rigtutorials101.59599 --pass x --port 3333

Or

(minerd)

minerd -o stratum+tcp://us-west01.miningrigrentals.com:3333 -u rigtutorials101.59599 -p x

Take note of the server/port in red and the username in blue, this shows different examples of different miners using the same information in different syntax.


d. In the case of this example, we will be using the first example.  So enter your pertinent information into notepad.  Then click File->Save As

e. Change the ‘Save as Type’ dropdown to ‘All files’


f. And erase the ‘*.txt’ in File name and enter ‘start.bat’. Ensure that the path is pointing to the same folder as your mining software and hit save

g. Once that is done, you are ready to test the connection.  Open the folder containing the miner and the batch file you just created and double click the start.bat file.  Once you see it connected to MRR and your pool and it has begun hashing you can leave it alone for now.

h. If you get an error or something doesn’t work, double check the syntax for your mining software and be sure you used the correct server, port and username from MRR.


i. After a few moments, under the ‘Workers’ tab on your rig configuration page, you should see your worker’s connection and its hashrate.  This verifies that everything is working and your rig is in fact connected properly.

j. You can use this section, as well as the live hashrate section to monitor your rigs and make sure they are performing the way you want them to.


Step 9: Update Pricing

  1. Now you are ready to price your rig.  Click the ‘Pricing’ tab at the top left of the rig configuration screen

b. Here you can price your rig a couple of different ways.  With automatic pricing, your rig will be priced automatically based on other available rigs of the same algorithm.  If you select no, you will need to enter a price manually.  Note the error on the bottom of the price screen saying that the minimum rental price is too low.  This means that you either need to adjust the minimum hours to rent (on the settings page) or you need to adjust the Price per KH Day.  As you can see below, the error disappears when you modify the price to meet that criteria:


c. Additionally, there are LTC and ETH tabs, which allow you to control whether or not you accept those currencies as payment for your rental.

d. Choosing to enable these currencies allows you to accept them as payment.  The auto pricing option, if enabled, just converts your BTC price into the respective currency using the GDAX conversion rate.  If you select no, then you will need to manually enter the LTC or ETH price.  


e. Once you are satisfied with the entries in the pricing section, click


Step 10: Update Availability

  1. The final step is to mark your rig as available.  To do this, click the ‘Settings’ tab at the top, and then change the dropdown from ‘Unavailable’ to ‘Available’


b. Change it to this:


c. Then scroll down and click .  Congratulations!  You have listed your first rig on MiningRigRentals.com!


Learn how to use our Pools and Profiles feature by viewing this video we made.